Showing posts with label Designer Series Paper. Show all posts

Tuesday, 23 May 2017

DAISY DELIGHT MEETS WATERCOLOR WINGS

A new stamp set meets an old favourite.  The Watercolor Wings works so well with our gorgeous new In-Colours - for the butterfly here I've  used Lemon Lime Twist, Powder Pink and stamped off Fresh Fig, just to soften the Fresh Fig a little.

This set works well with the Bold Butterfly Framelit Dies which I used to cut out the little butterfly.

I've been doing a few CAS challenges lately and its nice to throw loads of goodies at a card for a change.  This is definitely not CAS!


I've also used the Daisy Delight stamp and the Designer Series Paper.  I can see that these two combined are going to prove to be some of my favourites this year.

The cardstock is Fresh Fig.  There is some Wink of Stella on the petals of the daisy, and on the butterfly.  A Glitter Enamel Dot is used in the middle of the daisy and a few enamel dots on the butterfly.


I'm including this card in the challenge for #TGIFC108 - They have a sketch challenge this week.


I'm also including it in Stamp Ink Paper's challenge this week which is Card Maker's Choice - click on the image to be taken to their site.

http://stampinkpaper.com/2017/05/sip-challenge-100-card-makers-choice-and-blog-candy/


 HAPPY CRAFTING


Thursday, 6 April 2017

SLATTED EASTER BASKET - YOU TUBE TUTORIAL

I was looking for a large Easter Basket to make and came across these Slatted Baskets - big enough to put a decent size egg in or lots of other goodies.


 You will need the following supplies:

Two pieces of 12" x 12" DSP - Matching papers are nice but not necessary.

with the first piece cut 6 of 1" x 11" strips.  Score at 3 1.5" at both ends of the strips.

Cut one piece of 1 1/2" x 12" for the handle.

The other piece of 12 x 12 - score at

3/4", 4", 8" and 11 1/4" 
rotate a 1/4 turn and repeat scoring.

I'd recommend you watch the video below to see the cutting - its easier than trying to describe it on here.


 I'd love to know if you make any - do pop back and let me know.


Friday, 31 March 2017

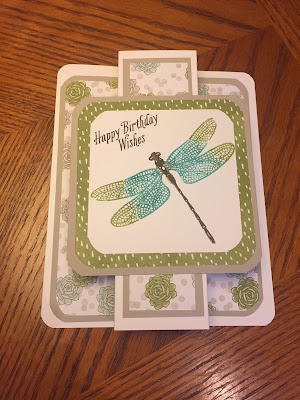
BEAUTIFUL YOU AND DRAGONFLY DREAMS PANEL CARD

I have a panel card for you today - these are a great way of using all that lovely Designer Series Paper we have.  I've shown two examples using Beautiful You and Dragonfly Dreams.

It is measurement heavy - I have done a Youtube tutorial which is shown below but here are the measurements for you also.  The Beautiful You uses Falling in Love Designer Series Paper.


 The Dragonfly Dreams uses Succulent Garden DSP


 Whisper White cardstock 8 1/4" x 5 3/4" (21 cm x 14.5 cm)
Score at 2 1/4", 3 1/4", 5" and 6" (5.5 cm, 8, 12.5cm and 15 cm)

Outer panels - (2)
Cardstock of your choice - 5 1/2" x 2 " (14 cm x 5 cm)
DSP - 5 1/4" x 1 3/4" ( 13 cm x 4.5 cm)

Central Panel - (1)
Cardstock - 5 1/2" x 1 1/2" ( 14cm x 4 cm)
DSP - 5 1/4" x 1 1/4" (13 cm x 3 cm)

Front Panel
Cardstock - 3 3/4" x 3 3/4" ( 9.5 cm x 9.5 cm)
DSP - 3 1/2" x 31/2" (9 cm x 9 cm)
Whisper White - 3" x 3" (7.5 cm x 7.5 cm)


 Thanks for stopping by - as usual all products can be purchased from my Store above.


Friday, 10 February 2017

STAMPIN UP GIFT CARD BAG - DESIGNER SERIES PAPER - YOU TUBE TUTORIAL

Here's a quick little gift bag you can make with any of our gorgeous Designer Series Papers.  It would be great for gift cards or vouchers.  I have shown two sizes here but you can make them any size you lik.  The larger size was made by drawing a circle around a CD - the smaller one was made with the largest of our Stitched Framelits.


 I used some of our Designer Series Stack papers for the smaller ones and Blooms and Bliss DSP for the larger.

There isn't actually any stamping with this little project.  The flowers were cut out using Botanical Builder Framelits.


Thursday, 26 January 2017

EASTER BOXES - GLOBAL DESIGN PROJECT #GDP071

The Challenge over at Global Design Project #GDP071 this week is a 3D challenge.

Which is very handy for me as I'm in the process of organising some Video Tutorials for Feb featuring Easter Boxes.

Here's one of the first which is the very popular Origami Box.  This is not my invention - I first saw it on Dawn Griffiths' blog and she in turn saw it on Elaine's blog and so the internet twirls round!

For my twist on it - I've used some of our lovely DSP Stacks paper which has some gorgeous papers suitable for Spring and Easter.  This colour yellow is so vibrant you can't help but think of spring and daffodils (Welsh girl see) and I think its a really cheery box.

It takes a lot of folding but once you know where you are going with it its so easy to make and you can adjust the sizes.

I will link up the tutorial here cause its easier to see it being folded than try and describe.

For the flower on the top I punched out the same paper with the scallop punch and just cut it into a twirl.  I added some of the leaves from the Botanical Framelits, the only bit of stamping (!), and some enamel dots.


Saturday, 23 July 2016

SIMPLY SKETCHED SATURDAY CHALLENGE


Hi Everyone and welcome to another Simply Sketched Saturday Challenge.   We’re so excited to be sharing this hop with you. The products used are all available in the current Annual, or seasonal, Stampin’ Up!® Catalogues*. Simply use the buttons at the bottom of the post to keep hopping!

Our Sketch this week was chosen by Louise Thomas of Whiteflagdesigns.  What a tricky sketch this one turned out to be for me.


 Here's my take on the sketch.  I used one of the New Colours Flirty Flamingo for my card base. 

The flowers are from the Botanical Builder Framelits. I used some Designer Series Paper in Mint Macaron for the leaves.  The Hello Friend is from the Jar of Love set.

 You know when you do something and then you think oho - that's not right - that's what happened with my card and the framelit from Botanical Builder.  I used the edging one but realised I had done it the wrong way.  However, - I re-cut it on some white card stock - added that to the edge of the inside of the card and Voila - it was as if I'd planned it that way and I actually love how its turned out.  Its like a mini jigsaw puzzle!


You can see the edging strip better on the inside of the card!


 I used the Botanical Blooms stamp set with some Versamark on the outside of the card and on the inside.  The sentiment is from Birthday Blooms.

Do pop along and see the next great card at Jillian's blog or pop back to Sally's  if you're going the wrong way!

http://www.purplejellydesigns.blogspot.co.uk
www.sallystampers.com


HAPPY CRAFTING


Tuesday, 5 July 2016

POST HOLIDAY BLUES

 I'm back from my week's holiday in Tuscany and I've got the post holiday blues.  Is it just me that gets them - surely not!  It was my first visit to Tuscany but not Italy and we managed to get to see Florence, the Ponte Vechio shown below and a lovely town called Lucca.

 Hubby and I at Ponte Vechio - not a lot there apart from jewellery shops but its something ticked off the list lol!


 The views from our villa.  Typical Tuscan one below I think with those signature trees.


And on to the crafting - I was prompted by Sam Hammond's new challenge on her blog.  Sam is my upline and its great to see her joining the challenge blogs.  Her challenge is a colour challenge and she gave us the following colours to work with - Click HERE to be taken to Sam's blog

Smoky Slate, Pool Party, So Saffron, Pink Pirouette.

I used three of the colours, including a touch of Whisper White.  I used Smokey Slate for the card base and for layering.  I used some of the lovely Designer Series Paper in Pool Party for the background and Pool Party ink for the leaves and Pink Pirouette for the flowers.


The Stamp Set I used was Love and Affection.  It has some lovely sentiments on it and with such small pretty stamps the possibilities are endless.

 I also used the Floral Affection Embossing Folder which works with this set.  They all come as part of the Affectionately Your Suite which also includes Designer Series Paper - which I don't have ..... yet!  I've finished it with a touch of Enamel Shapes in Pool Party.


All products as usual can be purchased via my website.  Keep an eye out for my blog tomorrow with news of some great SU Promotions for July.  Click on the catalogue below to be taken to  my website.

http://www.stampinup.net/esuite/home/fionawhitehead/


Happy Stamping

Wednesday, 22 June 2016

THREE STAMP SETS - FEELING BLUE?


 I didn't think I'd have time for any more crafting before I go away on holiday but I managed to sneak one in this evening.  I don't often do blue cards but found myself drawn to all these different blues this evening.  My card is inspired by the sketch on As You See It challenge. Click on their sketch to be taken to their challenge.

AYSIChallenge137


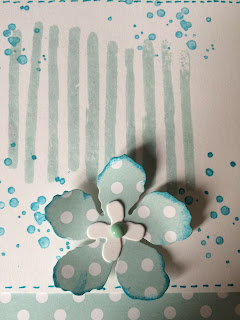
I've used three stamp sets for this card.  The stripes are from the Playful Backgrounds set.  I love this set - its so versatile.  They have been stamped in Soft Sky and I used Wink of Stella over the top to make them sparkle a bit.   The dots are from Painter's Palette and the sentiment is from Picture Perfect.  I've used some of our Designer Series Paper in Subtles for the background paper and the flower which is from the Botanical Builder framelits.  One of our enamel shapes in the middle finishes the flower.  I quite like the soft colours in this card - I may find I use blue more often.


 I think you can just about see the Wink of Stella sparkle.  I think my WOS may be on its way out.  I read a great tip from someone that, once its empty, fill it with water and you can still use it!


 Happy Crafting

Thanks for stopping by and do leave a comment - I love to read what you think.


Fiona


Friday, 3 June 2016

PAINTER'S PALETTE - PAPILLON POTPOURRI


The challenge over at Watercooler Wednesday this week is a sketch.  I'm delighted that my Masculine Card was given an Honourable Mention last week so I'm displaying my badge with pride.


And on to the sketch.  You'll find their challenge here


I'm still loving the Painter's Palette stamp set and must probably apologise early because I think there will be lots of cards made with this stamp set over the coming months.  I think its so versatile.  I've seen some lovely bunting made with the easel which I may attempt too.

It's a dull, cold day in June here in the UK so I chose some lovely Brights colours to cheer me up and, as the sun is not shining, there are few butterflies around at the moment.  Come on Summer - where are you?


I've used Tempting Turquoise with Melon Mambo.  My new purchase this month was the butterfly punches which are a must with the Papillon Potpourri Stamp set.  I did try to cut them out but these punches are so much easier and look fabulous.  A touch of enamel dots in Brights just finishes off the butterflies.

The Designer Series Paper is also Brights - thankfully not retired as I love these papers.

I've listed all the supplies used - just click on the link to be taken to my store and dont forget to use my Hostess Code for June which you will find on the right of my blog post.

SUPPLIES

 Painter's Palette Clear-Mount Stamp Set

Brights Designer Series Paper Stack