Showing posts with label Merry Tags Framelits Dies. Show all posts

Monday, 31 October 2016

LESS IS MORE - 300TH CELEBRATION - BANNER'S FOR CHRISTMAS

I haven't had the time lately to join in with any challenges but this one over at Less is More caught my eye this morning.

I was having one of those Monday's when I had no mojo and couldn't settle to anything.

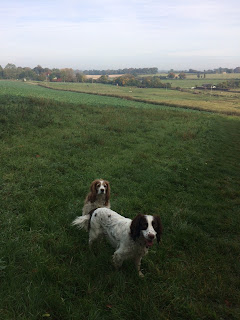
I took the dogs out for a walk in the country.  It is still beautiful weather here in the UK - one of the warmest October's I can remember - reminds me of warm Houston weather.  So we did a bit of Conker gathering and blew the cobwebs off and I came back and did a bit of crafting.

Some of these conkers and the leaf are actually bronze mixed in with real - can you tell which is which?
 
 Tegan (Welsh Springer red and white) and Bracken (English Springer) enjoying their walk


My card for the Challenge uses two stamp sets and a thinlet.  The mistletoe comes from Banners For Christmas - this isn't a set I've seen used an awful lot yet but I love this mistletoe stamp.  Here I've turned it right way up to represent a bunch of flowers and stamped it with Versamark and our Gold Embossing Powder.   I've used the Celebrate stamp from Here's To Cheers.  I used one of the bauble thinlets from Merry Tags to cut out the bauble shape and then stamped inside it with Versamark and embossed with our Gold Embossing Powder.

A touch of gold Baker's Twine and some Basic Rhinestones finishes off this card - which has a lot of 'white space' - okay red!


 Thanks for coming to see me - do leave a message or come and visit me at my YouTube channel to see some of my tutorials.

Happy Crafting


Saturday, 22 October 2016

SIMPLY SKETCHED SATURDAY CHALLENGE - MERRIEST WISHES, MERRY TAG FRAMELITS


It's time for another Saturday Sketch Challenge and this month our sketch was chosen by Sally Shaw.

This was the sketch we had to work with.


Here is my card - I actually have to thank my dear husband for the inspiration for this - he saw me sitting looking at the sketch - having discarded a few ideas into the bin when he thought the stripes looked like ribbon - Eureka! as they say!

I used Cherry Cobbler cardstock for the base and some of the Designer Series Paper This Christmas Suite. The Ribbon is Mini Striped Ribbon in Tip Top Taupe but it looks almost silver against the paper.

I've used the Merry Tag Framelits again - love these with a bit of Smoky Slate Cardstock.  The Banner and Sentiment is from Banners for Christmas with a touch of Dazzling Diamonds around the outside.  On the cardstock just on the bottom left I've used one of the trees from the Foxy Friends set with Versarmark just to add a bit of interest to the cardstock. 


CLICK ON THE LINK BELOW TO BE TAKEN ON TO  ANNA'S PROJECT
https://annastampincave.wordpress.com/
CLICK ON THE LINK BELOW TO BE TAKEN BACK TO LOUISE'S BLOG

 https://whiteflagdesigns.com/


THANK YOU FOR STOPPING BY ON OUR BLOG HOP AND HAPPY CRAFTING 


Tuesday, 18 October 2016

ENVELOPE PUNCH BOARD - CHRISTMAS CRACKERS -

Christmas Crackers are such an integral part of a British Christmas. I know when I lived in Houston, Texas I couldn't find them anywhere!  They are so easy to make and although they won't pop, at least you can decide what to put in them to suit whoever they are for.  You can also co-ordinate your Christmas table with colours to match your scheme - and gift favour bags to match - but that's another video for another day.

Here are a few samples using the Presents and Pinecones Designer Series Paper.  Some of our papers are on special offer at the moment, buy 3 get 1 free and this set was part of the offer.


 The Scroll and the Ho Ho Ho sentiment comes from Greetings From Santa set.

The Cracker below is the one I chose to do in the YouTube video.  This one uses the Heres to Cheers stamp set and the Merry Tag Framelits.  Dazzling Diamonds were added to the bauble for a touch of glitter.  Some Candy Cane Baker's Twine and Cherry Cobbler Baker's Twine completes the cracker.


Here are the sizes

 DSP - 6.5" x 10"  (16.5 cm x 25 cm)
On the LONG side score at 1" (2.5cm) either side

On the SHORT Side score at 1" (2.5cm), 2" (5 cm) 3" (7.5) 4"(10cm), 5" (12.5 cm) and 6" (15 cm)

Burnish the folds and using the EPB punch at 2" (5cm) on both sides all the way down the paper.

Now score at both ends at 1.5" (3.5cm) 2" (5cm) and 2.5" (6 cm) - this is actually just before the punch, in the middle and just after.


I hope you enjoy making these crackers.  If you would like to purchase any of the supplies through me I'd be happy to help you.  Just click HERE to be taken to  my online store.

Don't forget to use the Hostess Code for October ~(shown on the right hand side of my blog) if your order is under £150 to get free product. If your order is over £150 you do not need to use the Hostess Code as you will automatically get free goodies.

If you are in the Hampshire area - do get in touch - I hold lots of classes both day times, evenings and weekends.  


Wednesday, 12 October 2016

I'VE DONE IT - YOU TUBE VIDEO

Woohoo - inspired by all my lovely team members and fellow SU Demonstrators I've finally bitten the bullet and made my own You Tube video.

I've showcased the Bag in a Box which I did for my Splitcoast Stampers Design Team for October.


 Here are the measurements for the project in case you didn't catch them on the video.

Box:

Piece of cardstock 4.5" x 4.5 " (11.5 cm) score at 1" (2.5cm) all the way round.

 Designer Series Paper:

 11" x 5.5" (28 cms x 13.5 cms)

An extra strip of 10" x 1" (25.5 cms x 2.5 cms)


I'd love to receive your comments on my first one - now I've started I want to make more and hopefully they won't take me 34 attempts to get it right!


Tuesday, 27 September 2016

RAK - GLOBAL DESIGN PROJECT

The Global Design Project has a great challenge this week - Random Acts of Kindness.  I've been making lots of these box cards with attached tealights - they make great presents and so far I've made a New Home one and a 60th birthday one - 


My entry for the GDP is a Christmas one.  I've used the lovely Candy Cane Lane DSP and Real Red cardstock.


 The size fits three little tea lights perfectly - I think Yankee Candles are slightly bigger than these ones though.


 I cut out the house from the DSP and attached it to one of the Merry Tag Framelits and attached to the card with some lovely Candy Cane Lane Baker's Twine.  I used  Banners for Christmas Framelits for the sentiment and the sentiment itself came from Jar of Love.


The ribbon is Very Vanilla Stitched Satin - so beautiful to work with.


The whole card is then presented in a lovely box - I used Real Red Cardstock for the base and Candy Cane Lane DSP for the top.  A belly band was made in the same DSP and I used the Decorative Label punch with sentiments from Sweet Home stamp set.

If you would like to purchase a PDF tutorial for this project for £1.50 please lick on the paypal button below.


Tuesday, 20 September 2016

HERE'S TO CHEERS

Do You Remember? The 21st Night of September? I hope you are now humming the famous Earth Wind and Fire song.  I certainly remember the 21st of September because its my Wedding Anniversary.  31 years today - can't believe the time has gone so quickly.  I know everyone says that but its true!

A nice fun image of myself and my ushers back in 1985!  Sadly so many of them are no longer with us.


So hubby and I have taken ourselves off to a lovely place in Dorset, England called Lulworth Cove - just us and the dogs for a few days together.


Its a beautiful part of the county and we used to go a lot when the children were little.  My card today is a Celebratory card.  Also from the Winter Catalogue but maybe more New Year than Christmas but, as shown here, could also be used for Anniversaries or any Celebration.

  
 The colours have been inspired by Sam Hammond's Colour Challenge this week which is to use Flirty Flamingo and Mint Macaron and Tip Top Taupe.  You'll find the challenge here

I've used one of the framelits from the Merry Tags set to cut out the bauble and the sentiment fits exactly.  Marvellous!!  The Decorative Label punch was used for the cute image of the wine and the glasses.  Might be some of that being drunk tomorrow!!!

I finished the bauble off with a touch of Flirty Flamingo Ruched Ribbon - I love this ribbon - it's so pretty and nice to work with.


Friday, 16 September 2016

WATERCOOLER BLOG HOP - NEW CATALOGUE


Hi Crafters - Welcome to the Watercooler Blog Hop for September - I'm thrilled to be a part of this blog hop again this month.  We are focusing on all the great new products in the Winter Catalogue so here are three of my favourite projects so far.

My first one is a cute little tag box - so quick and easy to make.  I've made the box out of Crumb Cake cardstock and used some of This Christmas Suite Designer Series paper.  This is a lovely set of papers with the main colours of Garden Green and Cherry Cobbler - two of my favourites. I'm a traditional girl at heart and love Red and Green for Christmas - they are nature's colours after all for this time of year.


I've filled the little box with some tags using the Merry Tags framelit dies and the Merriest Wishes stamp set which come as a  bundle.  I love them - I can see they are going on everything this Christmas - cards, boxes, tags, even the dogs if they are not careful!!  A touch of our red twine from the Baker's Twine Trio pack finishes off the tags.  This pack comes with red, green and gold.  Yummy!


For my second project - I've been playing with the Sweet Home Stamp Set which also comes in a bundle with the Home Sweet Home Thinlet Dies.  I've switched to Hallowe'en for this project.  Although not as popular in the UK as it is in the US it is gaining in popularity as the years go by.

I do wonder though how many know the real reason for Trick or Treat at Hallowe'en?  Our ancestors believed that All Souls Night was a time when our departed loved ones would come back to visit - they used to set up the table as if their loved ones were still there and leave food out for them.  Hence the idea which developed into giving out sweets or candy at the door.  I still set the table for all my family members who are no longer with us and I have quite a few close family who have left me too early.

Anyway I have turned my little house into a Hallowe'en Ghost house.


I've used  Basic Gray for the house and Basic Black and Rich Razzleberry for the accents.  The ghosts have been made out of Very Vanilla.  I've used a touch of white gel pen on the roof and the door and a basic pearl for the door handle. 

 Don't you just love the way that ghost is peeking through the window!


I found these houses quite tricky to do and needed some help from a UK Demo Elizabeth Shannon to guide me through with her videos.  And then I was off and running.


My final project is also a card.  This time in Rich Razzleberry - I know not traditional red or green but so gorgeous at this time of year.

This set is Christmas Magic -a set of 8 rubber stamps - with three sentiments.  I love a stamp set I can colour in at this time of year and the traditional images in this set are right up my street. Reminds me of that lovely film Polar Express - I've told the story on my blog previously about the magical evening when we lived in Houston Texas in 2004 and went to the cinema Christmas Eve to see this film with the children.  When we came out there was snow -in Texas!!!!! We couldn't believe it and it was so magical after watching the film.


There is also a lovely tree stamp in this set and I've used Versamark to stamp it onto the background - hope it shows up well. 


 I hope you like my projects and are inspired by them to use some of these sets.  If you are in the UK you can purchase from me by clicking on my Online Shopping button above.

For your next batch of inspiration - click on the forward button to be taken to the fabulous Penny


http://pennytokensstampinspot.blogspot.ca/

 or if you are hopping backwards pop to see Martha


http://coffeepotstampingcafe.com/


 or click on the Home button to go back to the beginning


http://wackywatercoolerstamping.blogspot.com


 HAPPY CRAFTING


Monday, 5 September 2016

SPLITCOAST STAMPERS CREATIVE CREW DESIGN TEAM

Hi Crafters

Wow I've been away from blogland for a while - real life got in the way with an illness in the family and .....well you know how it is.  Crafting had to take a back seat.  Thankfully now all is well and I can get back up to speed again.

I was blown away to be invited to join the Splitcoast Stampers Creative Crew Design team - for the next four months - right up until Christmas - my favourite time for crafting.  For those of you who haven't found the wondrousness that is Splitcoast Stampers - you will find them here.  It pre-dates Pinterest by quite a number of years and for a while was the go-to place to find inspiration for Stampin' Up! and now lots of other stamp companies.  You will find every Stampin' Up! set that has ever been produced on this website.  

www.splitcoaststampers.com 


We had a number of briefs and four projects to do.  I won't put all four here today - but will keep you guessing - if that's ok.

Our first project was to use some Designer Series Paper on our card.  I gave you a sneak peek a few weeks ago:


 I used the DSP from the This Christmas Suite which is in the main catalogue. 
From our new Winter catalogue I used the Merriest Wishes bundle. This comes with the Merriest Wishes stamp set  a set of 11 rubber stamps and the Merry Tags Framelits Dies - a collection of 7 dies which co-ordinate.  I'm a sucker for reindeer at Christmas and as soon as I saw that little reindeer framelit that was me sold!


I made the ribbon using the DSP and our Envelope Punch Board. A great technique to try and really easy once you get the hang of it.  See my tutorials above to learn how to make a similar bow.


 I cut out the first Reindeer and Trees framelit in Very Vanilla and then again in the DSP and then cut out the deer and the trees and adhered them to the framelit.  The 25 is also part of this set.  A touch of basic pearls just finishes off the card.


 I hope you like the card - pop back tomorrow to see the next project for the SCS Creative Crew Design.


Friday, 19 August 2016

WATERCOOLER BLOG HOP


I've really enjoyed playing along with the Watercooler Wednesday challenge every week and I'm delighted to be part of the Wacky Watercooler Blog Hop for August 2016. This is our theme and this was our brief:


THEME:  Stepping it up:  One, Two, Three!

RULES:   Project one:  The simple, “I’m in a hurry” card.  Project two:  A look at the same card, stepped up a bit, “I have a bit more time to fuss” version.  Project three:  The same card again but this time totally stepped up, “Let’s see how fancy I can make this card” version.


Pop along our blog hop and see all the great creations the team has done for you.  Click on the images below to be taken along on a fabulous creative ride.

Sorry to show you Christmas in August but I've been using some of our new stamps from our Winter Catalogue and once you start you just can't stop!! You can start purchasing from 1st September and if you're in the UK all products can be found on my Website.

So my basic card is a gatefold card which uses one of the framelits from the Botanical Builder set.  The cardstock is Old Olive.  The two images on the front were made with one of our new sets Merriest Wishes and the Merry Tags framelit dies which match.

STEP ONE - BASIC CARD


The inside of the card has been layered onto some of our This Christmas Designer Series Paper and stamped with a sentiment from the Merriest Wishes set.

 Just a little tip here but I'm sure you all know it.  When I'm using some paper as a background, and to not waste every little scrap of DSP or cardstock I cut out images or shapes from the paper before I layer it.
As you can see here - the cut out images are covered but I have some more pieces to use at a later date.


STEPPING IT UP - STEP TWO

I've added some more details to my card in Step Two.  The cut out that we used above has been cut and glued onto the reindeer and the trees to co-ordinate with the background DSP and to add some extra interest to the beautiful reindeer bauble.  I've used another stamp from the Merriest Wishes to the Glad Tidings and popped the sentiment up on a dimensional to add some extra interest.


 Here you can see the DSP cut out and glued onto the Reindeer and the Trees.


STEPPING IT UP - STEP THREE


So now I've gone all out with the added extra interest.  I've stamped another of the stamps onto the bottom of the bauble.  I've added some Warmth and Cheer Designer Washi Tape to the edges of the cardstock so that they meet in the middle and a touch of our new Candy Cane Lane Baker's Twine which is whisper white with a thread of metallic red running through it  to add some glitter along the side of the card.  There is a touch of Wink of Stella on the Reindeer and the Trees to help the bling along.


Inside I've added Ho Ho Ho which comes from the new Greetings from Santa set.
Some Basic Rhinestone on the top of the Be Joyful adds a touch more bling.


And here you can see the finished card in all its glory.


THANK YOU FOR VISITING MY BLOG - NOW HOP ALONG TO HEIDI'S BLOG TO SEE WHAT SHE HAS IN STORE FOR YOU


http://heidistampinalong.blogspot.com/ 


 If you're going backwards through our blog hop pop back to Marie Green's blog to see what she has done for you


http://mytanglewoodcottage.blogspot.com/


IF YOU WANT TO POP BACK HOME - JUST CLICK BELOW TO BE TAKEN TO THE START OF THE BLOG


http://wackywatercoolerstamping.blogspot.com


 HAPPY CRAFTING